How to build a webpage -for free- in 5 min or less*
I thought that the first post of this web-page should reflect the nature of the universe i.e. always moves to increase entropy. Moving from order to to chaos (if your are interested about this concept watch this Brian Cox video). I will begin by explaining how this web-page was build. Then I will blame the universe for all the chaos that will follow.
* Disclaimer: This web-page was build using git-hub pages, Jekyll, and posts are written in markdown. Only continue if that is what that gets you on. 5 Min time frame is true if you have the tools used pre-installed, or if you are an Ninja.FYI the wonderer above is on a mac uses iTerm, and sublime.
Steps to build a web-page
Get a github account
Dear wonderer, you really need a github account. It is free, and it will make your life less miserable (not really) so get one, click here.I know I’m just a stranger, but trust me on that.
Log in to your github account and use a template.
Download this template on your computer using zip (see picture below). This avoids git from being initialized yet. You can use any template available from here.

Bunble your web-page
Fire up your terminal and change using cd to the directory you just downloaded. Once you are in do:
bundle install
Bundler provides a consistent environment for Ruby projects by tracking and installing the exact gems that are needed for your web page to work.
Run Jekyll
bundle exec jekyll serve
The code above will build your web-page (if you do an ls now you will see a site folder in your current directory). You can check if your web-page is working by inserting the address given in the terminal i.e. http://127.0.0.1:4000/ to your browser. This actually builds your web page locally so you can check everything is working as you intended before uploading your page.
Initialise git
In you web page root directory initialize git
git init
This enables git, tracking how you change a file so you can revert back to a previous time or whatever (the power of git)
Stage all your web-page files
The way git works is that it is tracking how files change, before it can do that, git must know which files to track. To add all current files to stage do the command below
git add .
Commit your changes
Final stage of the git work flow is to commit your changes. You do this using the command below accompanied by a relevant message.
git commit -m "initalization of a webpage"
Go to github to publish page
Make sure your do not have any other repositories .io repositories. This is important because every github user gets a free “user” web-page . Create a new repository named your_git_username.github.io. Click on create repository and then copy and paste the provided commands as suggested in git to push your local git repository to github. In my case the commands are:
 git remote add origin https://github.com/t-power89/t-power89.github.io.git

 git push -u origin master
The link will be different in your case.
Make sure the web-page is published
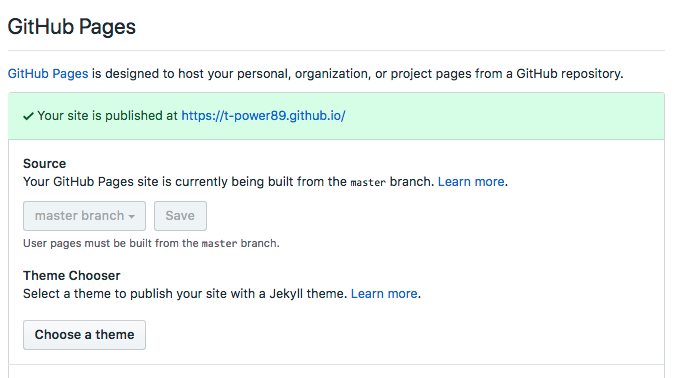
In github got to the web-page repository. Click settings and go down in the github pages. if you have a link of your web-page in a green background the site is successfully build this will look as the image below. This is your address link for your web-page. Click on it to go to your page.Clap

Edit your page
As a good practice, you will want to edit your web-page locally and once your are happy with the result push/publish your page. To do this open your terminal, cd to the webpage repository and do:
bundle exec jekyll serve
This builds your web-page locally. Copy and paste the address output of the terminal to your browser to check your page. Now edit any file in this repository to suit your needs. It is important to run this command from your webpage root directory. I like dragging and dropping this web-page folder in sublime and work from there. Every time change a file, save and refresh your local page to see the change. I would start by editing the _config.yml file first, then changing the avatar picture etc and the txt below the picture within the default.html.
Writing a post example
Your posts live in the _posts folder. To write a new post copy and paste one of the defaults but name it according the specific format i.e.:
2018-04-18-How-to-build-a-webpage-in-10-min-or-less.md
It is important that your posts start with these lines:
---
layout: post
title: Your title
---
To include an image in your post. Paste the image you want to include in the image folder under fulls. Then at the position where you want to add your image do:
<img src="/images/fulls/my_image_name.jpg" class="fit image">
Publishing
Once you are happy by the way your page looks locally. You need to push these changes to github. To do this, in the terminal stage all the local changes by doing
git add .
Then commit the changes by
git commit -m "my post"
Finally push your changes to github by:
git push origin master
If you have some basic experience with terminal and git you can build a page in 5 Min or less. If you lack any previous experience then it can take you up to 42 minutes